If you want to include the sprocket holes when scanning 35mm film, there are a number of ways to do so. Assuming you have a medium format film holder, you can try to to use that to hold part of it. You may want two pieces of cardboard and sandwich the film between it and place that on the glass or into your medium format film holder.
I have had success making numerous custom film holders from magnetic sheets. These are commonly sold at office supply stores and are designed to be printed on and cut out to shape for custom magnets. I cut out the size needed from two of them and lay one other the other to keep the film is position. It works very well though it can be a bit fiddly to position the film.
Lomo sells an item called the DigitalIZA which is an ingenious film holder designed to facilitate the process of scanning sprocket holes. It works quite well with a clever system of loading in the film. If you want the easiest method and don't mind spending $35, then that is the way to go.
On the opposite end of the spectrum is simply taping the negative directly to the glass. That works, but you will end up cleaning the glass a lot due to the inevitable fingerprints and tape residue.
Lastly, it is important that your film is very flat when attempting to scan the sprockets. Especially if you are using a DigitalIZA. I find the best way to do this is to place your film in a large book with a few books stacked on it overnight.
NOTE: Be careful not to cover the area of the flatbed scanner that is used to calibrate itself. If you look at your film holder, there is likely a little notch with some sort of 'do not cover' indicator on it. When you use any of the methods above, just be sure that you don't cover the corresponding area on the scanner.
Thursday, April 25, 2013


Wednesday, March 20, 2013
Rockaloid Liquid Light Photographic Emulsion Instructions
Liquid Light is an enlargement-speed, silver-halide photographic emulsion for making salon-quality prints on any material. Processing is with standard paper developer and fixer. Liquid Light is non-toxic and is unique in containing no phenol or other solvents, and can be used safely in any darkoom. Follow these instructions carefully to obtain durable, archivally-permanent prints.
SURFACE PREPARATION
Paper and fabric do not need a pre-coat because they are porous enough to anchor the emulsion, so Liquid Light can be coated directly onto them. (Unwashed fabrics, including raw artists' canvas should be washed and dried before coating.)
Paper and fabric do not need a pre-coat because they are porous enough to anchor the emulsion, so Liquid Light can be coated directly onto them. (Unwashed fabrics, including raw artists' canvas should be washed and dried before coating.)
Other materials-- metal, plastics, wood, etc.-- need an oil-based pre-coat for good adhesion and to prevent discoloration. For a transparent pre-coat, use glossy polyurethane varnish. For an opaque pre-coat, use oil-base, or alkyd, primer. Both are available at paint and hardware stores. (Oil-base coatings are those that the label says can be thinned with mineral spirits. Do not use water-base coatings or acrylic gesso, aerosol spray coatings, satin or matte varnishes, artist's oil paints, damar varnish, lacquer or shellac. They may be softened by developer.) Note to artists: If canvas has been primed with water-base gesso, it should be given a topcoat of alkyd primer or glossy polyurethane.
Glass and glazed ceramics only: These also require a pre-coat for adhesion, such as polyurethane, but a better alternative is a gelatin precoat or traditional photographic "subbing" solution, which fuses the photographic emulsion to the glass. Subbing works only with mineral-base materials like glass and chinaware, glazed tiles, ceramics and fired porcelain. Do not use on plastics, metals, or other materials-- use polyurethane. For a guide to the subbing procedure, see "Subbing" in Table of Contents.
COATING & EXPOSING LIQUID LIGHT
Safelight: Use a medium amber, dark yellow or light red safelight when handling Liquid Light. Because it is relatively slow, Liquid Light can tolerate a large amount of safelight brightness and exposure time without fogging. (For maximum safelight output, a low-pressure sodium-vapor lamp with amber filter can be used.)
Safelight: Use a medium amber, dark yellow or light red safelight when handling Liquid Light. Because it is relatively slow, Liquid Light can tolerate a large amount of safelight brightness and exposure time without fogging. (For maximum safelight output, a low-pressure sodium-vapor lamp with amber filter can be used.)
At room temperature, Liquid Light emulsion is a solid gel. Before use, plunge the bottle into a container of hot water (130 deg.F or higher) until the emulsion turns liquid. This happens at about 115 deg.F or 46 deg.C. (A microwave oven can be used if care is taken not to overheat the emulsion. Maximum time: 20 to 30 seconds on "high".) Do not shake the bottle, as bubbles may form. The emulsion is uniform throughout, so it is not necessary to melt the entire contents if only a portion is being used. Use containers of glass, plastic, enamel or stainless steel; plain steel, brass, copper, aluminum and other metals will react with the silver compounds in the emulsion to form black specks.
Apply Liquid Light with a brush, sponge, paint applicator, paint roller, spray, or by flowing on and draining off the emulsion. If spraying, be sure the spraygun has no brass parts. Dilute the emulsion with warm water if needed. Porous materials need two or more coats. At the same time, coat a few pieces of paper or index cards to serve as test strips for correct exposure.
Small areas: The easiest way to coat is to pour on a surplus of emulsion, spread it quickly with a fingertip and pour the surplus emulsion back in the bottle, leaving enough emulsion to make an opaque white coat. After coating, cool air will help to set up the emulsion. Use a fan if available. After a few minutes, the emulsion will set up or become sticky and can be exposed and and developed. Or it can be dried and put away for future use.
Large areas: Keep the emulsion warm in a container of hot water so that it stays liquid as long as necessary. Use a soft brush or other means of spreading it. After the emulsion has been coated, put a fan on it a few minutes, until it becomes sticky, then give a second coat at right angles to the first. Allow the second coat to set up or become sticky, then expose and process it, or dry it and set aside for future use. If dried, it must be dried thoroughly under low humidity and with circulating air, not in a closed box.
Exposing: Liquid Light exposure varies with age, so differently dated batches may exhibit different sensitivity. A suggested trial exposure time for an enlarger at full aperture is 20 seconds for an 8x10 inch print. Determine the exact exposure with a test strip.
Using a projector: For large prints such as wall murals, artist's canvas and other oversized surfaces when an enlarger does not give enough light, a slide projector can be used. To limit light output and sharpen the image, tape a piece of black paper having an approximately 3/8 inch hole over the front of the projector lens. Or use a polarizing filter. Because of the high light output of a slide projector, color negatives can also be used to yield black-and-white prints.
PROCESSING LIQUID LIGHT
Develop with paper developer like Kodak Dektol at the recommended working strength of one part developer to two parts of water. Develop in a tray like a conventional print, or if the print is too large, by a sponge or brush liberally wetted with developer. (For large surfaces, even-out development by first wetting the surface with cool water.) For large prints and canvases, a temporary "tray" can be made from a larger-size primed stretched canvas containing the processing solutions.
Develop with paper developer like Kodak Dektol at the recommended working strength of one part developer to two parts of water. Develop in a tray like a conventional print, or if the print is too large, by a sponge or brush liberally wetted with developer. (For large surfaces, even-out development by first wetting the surface with cool water.) For large prints and canvases, a temporary "tray" can be made from a larger-size primed stretched canvas containing the processing solutions.
Shortstop: After developing, do not use a water rinse or an acid shortstop, which will soften the emulsion. Instead, use a small amount of fixer as a shortstop (worn-out, discarded fixer is okay.) A few seconds in this bath will neutralize the developer.
Fixing: For best results, use a powdered hardening fixer like Kodak Fixer. Avoid liquid or rapid fixers, which can bleach the image and do not effectively harden the emulsion. Fix until all the chalky white areas of the emulsion have turned transparent and it becomes tough and leathery to the touch-- at least 10 minutes. Note: the function of a fixer is to wash away the unused silver compounds; therefore, the fixer should be used generously, with frequent agitation.
Wash ten minutes in cool running water after hardening is complete. Liquid Light prints wash easily because water easily penetrates the emulsion. A hypo eliminator or hypo clearing agent can be used if desired. After drying, a wrinkled print can be flattened by pressing with a flatiron or dry-mount press on low-heat setting.
Protect the surface only if a harsh environment exists or it will be shown outdoors. Normally, Liquid Light requires no protective coating. For best protection, coat the dried print with a water-based polyurethane finish. (Do not confuse with the oil-based polyurethane used as a pre-coat. After Liquid Light has been processed and dried, the choice is much greater and virtually any type of oil, water, or solvent-based finish can be used as a protective finish.)
Adding color: The color and texture of the surface that has been coated are visible through the transparent areas of a Liquid Light print, so extra colors are often not used. Liquid Light prints can be toned with conventional sepia or selenium print toners or with Rockland Selectachrome and Printint toners. Liquid Light can also be hand-colored with artist's oil paints, photographic oils, water-based acrylics, or virtually any other type of paint.
CLEANUP
Liquid Light emulsion contains no hazardous chemicals and requires no special precautions for use except when spraying. If spraying, use adequate ventilation and wear a respirator. Emulsion that has not been hardened by fixing can be removed from surfaces with hot water. Fixed, hardened emulsion can be dissolved with dilute solutions of household bleach like Clorox or Purex. © Rockland Colloid
Liquid Light emulsion contains no hazardous chemicals and requires no special precautions for use except when spraying. If spraying, use adequate ventilation and wear a respirator. Emulsion that has not been hardened by fixing can be removed from surfaces with hot water. Fixed, hardened emulsion can be dissolved with dilute solutions of household bleach like Clorox or Purex. © Rockland Colloid
Friday, March 8, 2013
Some good portraits using Polaroid film
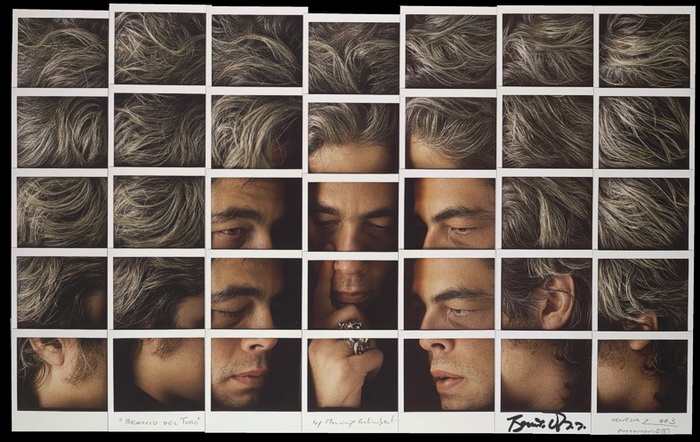
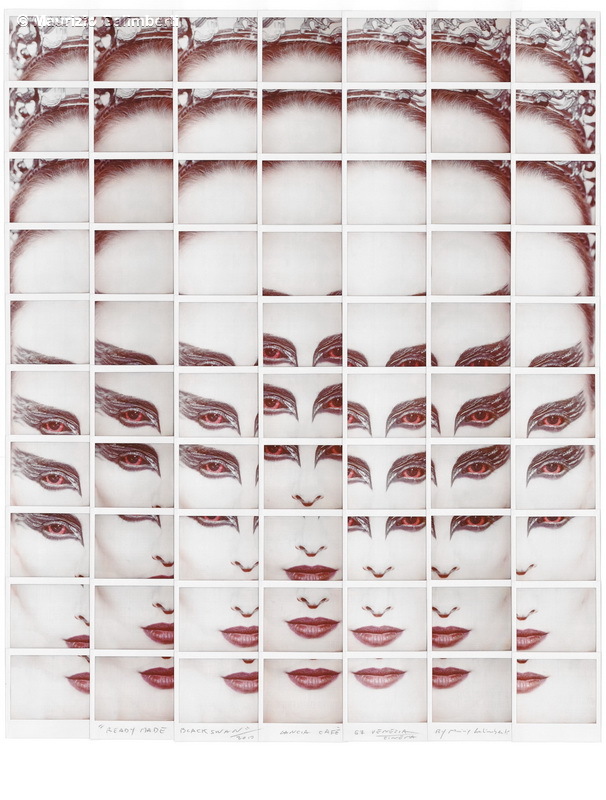
A nice series of work by an Italian photographer Maurizio Galimberti. He used Polaroids for these, of course you don't have to use Polaroid film. Some of you took B&W photo with me and we did a very similar assignment using contact prints from a single roll of film. Of course you can shoot it digitally and composite using an image editing program as well.

Monday, February 25, 2013
How to do Emulsion Lifts using Polaroid films


How to do Emulsion Lifts
This handout is a heavily modified version of a Polaroid handout.
Seder Burns
Emulsion lifts are the easiest and most exiting Polaroid creative technique to master. All they entail is soaking a print in warm to very hot water until the image comes loose, then re-depositing the freed emulsion on a new receptor sheet. Because emulsion lifts involve separating the image from the photographic paper, there is enormous potential for manipulating the picture to create different shapes. Traditionally, emulsion lifts are done using color prints from Polaroid ER films (Types 669, 59, 559, 809), but the same technique also works in B&W using Polapan Pro 100 films (Types 664, 54, 554, and 804) - albeit with the need to use boiling, rather than just hot, water. Prints must be fully dried before being subjected to emulsion lifting. Drying can be accelerated using a hair drier, but to be safe it is often best to allow at least overnight drying of prints before use. Step One Heat water up in the coffee machine. Fill one tray with hot water from the coffee machine, and another tray with room-temperature tap water. In the tray with room temperature water, submerge the substrate that you are going to transfer the emulsion to. Step Two Immerse a fully-dried Polacolor ER print face up in the tray of hot water for about four minutes. Agitate the tray to keep the print under the surface of the water. It is not necessary to keep the water heated during this time. After four minutes have elapsed, or if the emulsion begins to float free from the substrate/backing/photographic paper, remove the print from the hot water using tongs and place it in the tray of room temperature water. Step Three Lightly push the emulsion from the edges of the print slightly toward the center. Lift the emulsion and slowly peel it away from the substrate. Carefully float the emulsion onto the new substrate. Use your fingers to push and stretch the image to further manipulate it. You can also dunk the emulsion/paper in and out of the cold water to further manipulate the image. When finished, roll the image with a soft rubber brayer roller from the middle to the edge. Start with just the weight of the roller, gradually increasing pressure only after all the excess water and air have been removed. You are done when all the folds, wrinkles and other effects look pressed down. Hang dry when finished. If you are in a hurry, you can use a hairdryer on a low setting to speed things up. Step Six If desired, spray with a clear UV protective lacquer coating. When completely dry, the image can be finished with pastels, watercolor paints, dye and pencils if desired. Materials needed for Emulsion Lifts: • Polaroid camera or Daylab • Polaroid film, type 669 • Light meter • Tripod • Coffee maker • Transfer Substrates-watercolor paper, glass, tiles, or other porous materials • Slide projector or data projector • Images to project • Instructions for using a Polaroid back • Examples of Polaroid lifts • Hairdryer • Extension cords • Thermometer • Timer/Watch For more information on creative uses of Polaroid products, visit www.polaroid.com or call Polaroid’s technical number at 800-225-1618
Wednesday, February 13, 2013
Monday's class -
Turn in your Cyanotype prints for a grade.
I will do a demo on reducing the density of VDB prints.
Hang up some VDB and Cyanotype prints in the hall.
I will do a demo on reducing the density of VDB prints.
Hang up some VDB and Cyanotype prints in the hall.
Sunday, February 10, 2013
Van Dyke Brown - next project
Hello all,
At the beginning of class on Wednesday the 13th, we will spend a few minutes looking at the Van Dyke Brown prints that you have thus far. We will also look at any final Cyanotype prints.
On Wednesday February 20th, we will have a critique of your VDB prints. 2 prints of original, new imagery.
So, you will have to create at least two new negatives and print/reduce/tone them until you get them as desired. You will have to use class time effectively and possibly come in to the lab outside of class to pull this off.
SILVER NITRATE STAINS SKIN - BE CAREFUL WHEN MIXING THE SOLUTION.
ALS0- DONT USE ANY BRUSHES WITH METAL WHEN APPLYING THE SOLUTION AS A CHEMICAL REACTION MAY OCCUR.
Wikipedia summary of the process
Great write - up of the process
A great resource on the process including how to chemically reduce the prints after they dry.
Nice article on Van Dyke Brown including information on chemical reduction and toning.
There is also a really great step by step write up to make a negative for VDB prints. VDB prints are very flat by nature. I read somewhere that it is like printing onto Grade 1 photo paper. So, you have to make a very high contrast negative to account for this.If you use your negatives that you made for Cyanotypes, you can expect to get very flat prints. Given the color of VDB prints, they will really look like mud. Here is the article about how to make the curve for VDB.
Beyond the Blues - good overview of the process and ideas for combining the process with Cyanotypes
Orgins of the name
Another nice write up on the process with an emphasis on making archival VDB prints
More notes on the archival processing pertaining to VDB
At the beginning of class on Wednesday the 13th, we will spend a few minutes looking at the Van Dyke Brown prints that you have thus far. We will also look at any final Cyanotype prints.
On Wednesday February 20th, we will have a critique of your VDB prints. 2 prints of original, new imagery.
So, you will have to create at least two new negatives and print/reduce/tone them until you get them as desired. You will have to use class time effectively and possibly come in to the lab outside of class to pull this off.
SILVER NITRATE STAINS SKIN - BE CAREFUL WHEN MIXING THE SOLUTION.
ALS0- DONT USE ANY BRUSHES WITH METAL WHEN APPLYING THE SOLUTION AS A CHEMICAL REACTION MAY OCCUR.
Wikipedia summary of the process
Great write - up of the process
A great resource on the process including how to chemically reduce the prints after they dry.
Nice article on Van Dyke Brown including information on chemical reduction and toning.
There is also a really great step by step write up to make a negative for VDB prints. VDB prints are very flat by nature. I read somewhere that it is like printing onto Grade 1 photo paper. So, you have to make a very high contrast negative to account for this.If you use your negatives that you made for Cyanotypes, you can expect to get very flat prints. Given the color of VDB prints, they will really look like mud. Here is the article about how to make the curve for VDB.
Beyond the Blues - good overview of the process and ideas for combining the process with Cyanotypes
Orgins of the name
Another nice write up on the process with an emphasis on making archival VDB prints
More notes on the archival processing pertaining to VDB
Thursday, October 11, 2012
Course Blogs
For each course that I teach, I create a blog to facilitate its instruction. It has proven to be invaluable to both the students and myself. One advantage is that it allows the students access to the information long after the class has concluded. Additionally, I have found that a large number of the general public visit the blogs.
ART 2030 Photography
FALL 2012
ART 1070 Fundamentals of Digital MediaART 2030 Photography
SPRING 2012
ART 4000 Large Format PhotographySPRING 2011
Urban Landscape Photography
Subscribe to:
Posts (Atom)